What is front lighting in photography? How to use it to get appealing front-lit photos? In this article, we will focus on the following topics to help you get more understanding of it:
- What front light is in photoshoots?
- What are its pros and cons?
- When to use it?
- How to create and work with front lighting to capture stunning photos?

What is front lighting in photography?
In this part we will talk about its definition and its differences from other direction of photography lighting.
Front lighting photography definition
Front lighting is a common technique where the light comes from behind the photographer and directly illuminates the subject’s front. It eliminates most shadows on the camera side, resulting in even illumination. While it’s considered safe due to its ability to minimize light anomalies, some criticize it for making subjects appear less interesting because it flattens the image. Front lighting is commonly used in landscape or portrait photography to achieve equal illumination across the subject.
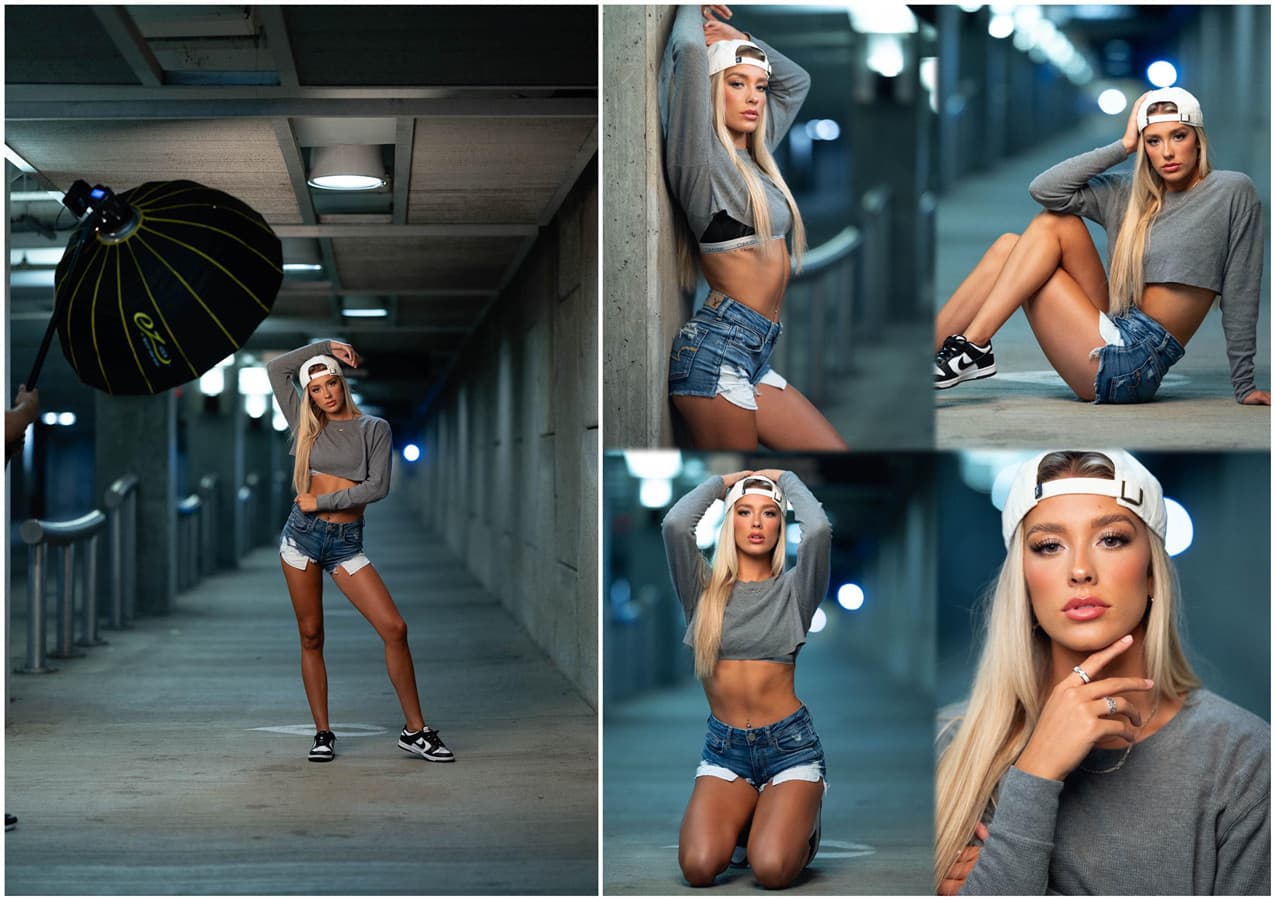
Front light photography examples of using COLBOR CL100X
What are its differences from other lighting directions?
Side, back, and top lighting for other common lighting directions used in photography. Here we will briefly introduce them to help you learn about there differences from front lighting.
Side lighting: It creates shadows for depth
A side light is a style of lighting in which the light source is positioned on the subject's side. This produces shadows, which may give depth and dimension to your photography or videography. Side lighting can be natural or artificial, based on your preferences. One benefit is that it may provide dramatic effects by accentuating texture and contour. However, it may cast harsh shadows, which may not be acceptable for some subjects. When employing side lighting, it is critical to position your subject precisely to obtain the intended look.
Back lighting: It can be used creating silhouettes
Backlighting occurs when the primary light source comes from behind your subject. This produces a silhouette effect in which your subject seems darker against a brighter background. It can help to produce melancholy or dramatic photos. Backlighting is likely to produce exposure issues if not used properly. The camera may underexpose your subject to compensate for the bright background. To avoid this issue, utilize your camera's manual settings and make adjustments appropriately.
Top lighting: It produces shadows to highlight texture and shape
Top lighting occurs when the main light source comes from above your subject. This produces shadows that highlight texture and shape, comparable to side lighting but with a less dramatic impact. One advantage is that it may produce unique patterns on surfaces such as skin or cloth. However, when not properly positioned, it can cast unpleasant shadows on face features.
Background lighting is also commonly used in photography. Check the article Light effect on background: Why it matters and how to create? to learn how to add more visual interest to your photo shooting.
Advantages and disadvantages of front light photography
Using front lighting for photography is simple and versatile, which is beneficial, especially for novice photographers. However, it lacks depth and dimension and creates less contrast than other lighting types.
Advantages
There are several advantages to using a front light, including:
User-friendly: Front lighting is a prevalent and easy-to-use lighting technique in photography. It provides uniform illumination to the subject, enabling even novice photographers without much experience in lighting techniques to create an appealing image.
Flattering: Front lighting does not cast harsh shadows on the subject, making it ideal for capturing family gatherings or landscape shots. It also reduces the visibility of facial lines or imperfections on the subject's face when the light source is coming from the front.
Flexible: Front lighting can be achieved using both natural and artificial light sources, making it suitable for both indoor and outdoor photography. To enhance front lighting and create a stunning image, modifiers like diffusers or reflectors can be utilized if needed.
Disadvantages
Front lighting in photography has its advantages, but it also comes with some limitations:
Flat appearance: Front-lit photos tend to look flat because the light hits the subject directly from the front. This lack of shadows can make the image appear two-dimensional and lacking depth. If you’re aiming for a more dramatic or sculpted look, other lighting angles may be more suitable.
Reduced texture and shape: Since front light minimizes shadows, it can reduce the visibility of textures and shapes. If you want to emphasize details, consider using side lighting or backlighting instead.
Less dramatic portraits: While front light is great for even illumination and smooth skin tones, it may not create the dramatic effect desired in portrait photography. Shadows add character and depth to portraits, so consider using side or back lighting for more compelling results.
Challenges with specular highlights: When using front light, specular highlights (bright spots caused by reflections) can be more pronounced. These highlights can distract from the subject or create unwanted glare.

When should you use it?
Front lighting in photography minimizes shadows, resulting in a flat appearance without much depth. While this may suit abstract two-dimensional shots, it’s also beneficial for various nature photography genres (such as bird, wildlife, and macro) because it clearly illuminates both the subject and the background.
In portrait photography, front light creates smoother skin tones, especially when the light is soft and filtered. In contrast, side lighting tends to emphasize skin imperfections and wrinkles. Additionally, front-lit subjects are easier to expose properly because front light is typically even. If you prefer automatic or semi-automatic exposure modes, front lighting often yields excellent results.
Seven front light photography tips
In this section, we will share some tips and tricks for front light photography to get stunning photos.
Get light source to create front lighting in photography
Natural and artificial lights are both good options. They are suitable for different situations and have their pros and cons.
Natural Light
- Sunlight: When shooting outdoors, the sun is a primary source of natural light for front lighting. Photographers often position themselves so that the sun is behind them, illuminating the subject directly.
- Sky: On overcast days or during twilight hours, the entire sky acts as a diffused light source, providing soft and even illumination for front-lit photos.
Artificial Light
- Studio Lights: In studio settings, photographers use various types of studio lights, such as softboxes, umbrellas, or strip lights, positioned in front of the subject to achieve front lighting. These lights can be adjusted in intensity and direction to control the quality of light.
- Speedlights: Speedlights, or external flashes, are portable artificial light sources that attach to the camera's hot shoe or are triggered remotely. They are commonly used for on-location photography and can provide directional front lighting.
- On-Camera Flash: While not as versatile as off-camera flashes, the built-in flash on cameras can still be used for front lighting in situations where additional lighting equipment is not available. However, care must be taken to avoid harsh shadows and overexposure.
Use light modifier to soften hard front lighting
Front lighting in photography can be harsh, but you can soften it for a more natural look. Light modifiers like softboxes or diffusers are helpful tools. They spread out and diffuse the light, creating a flattering effect on your subject. When using a light modifier, proper positioning is crucial. Too close can cause hot spots and overexposure, while too far results in underexposure. Experiment with distances to find the sweet spot for your shot.
Adapt camera settings to avoid overexposure in intense lighting conditions
When dealing with photography front lighting, preventing overexposure in bright conditions is crucial. Adjust your camera settings accordingly:
- Use a low ISO setting to reduce noise and improve image quality.
- Opt for a fast shutter speed to freeze motion and avoid blur.
Additionally, consider adjusting your aperture based on desired depth of field:
- A wider aperture (lower f-stop number) results in shallower depth of field.
- A narrower aperture (higher f-stop number) provides deeper depth of field.
Play with angles and placements for appealing front light in photography
Front lighting does not have to be dull or flat. By playing with various angles and placements, you can produce intriguing and dynamic photos that really stand out. Try photographing from above or below your subject to get various viewpoints, or walk around them to get the most attractive angle.
When situating yourself relative to your subject, remember that direct front lighting might flatten features or cast unattractive shadows beneath the eyes or nose. To add depth and character to your photo, move slightly off-center or angle your subject's face.
Use spot metering to guarantee accurate exposure on the subject's face
Spot metering is an effective technique for assuring optimum exposure on your subject's face, especially in tricky lighting situations. It allows you to meter the light only on your subject's face, rather than getting an overall reading of the scene.
Simply pick spot metering in your camera's settings and direct the focus point to your subject's face. This will guarantee that their skin tone is adequately exposed rather than washed out or underexposed.
Use reflector or fill flash to introduce depth and balance to front-lit images
Using a reflector or fill flash can help give dimension and balance to front-lit photographs. A reflector may bounce light back onto the subject from a new angle, resulting in extra depth and contrast in the photo. A fill flash may also be used to lighten shadows and create catchlights in the eyes.
When utilizing a reflector, place it opposite the key light to bounce light back onto your subject. When utilizing a fill flash, adjust the power to avoid overpowering the main light.
Manipulate shadows and contrast for increased dramatic impact
Finally, don't be scared to experiment with shadows and contrast while using front lighting. You may produce more dramatic and compelling photos by purposely adding shadows or enhancing contrast in post-processing.
For example, photograph against a dark backdrop or slightly underexpose to generate deeper shadows. Alternatively, boost contrast in post-processing by changing levels or curves for greater effect.